150W constant current load (60V 10A)-battery capacity Tester
Table of Contents
150W constant current sink (60V 10A) - battery capacity Tester
Features
- 60V 10A (Derating above 20V)
- 150W maximum power dissipation
- temperature controlled fan
- Thermal shutdown
- Auto/manual adjustment
- Capacity gauge
- Timer
- Low voltage cut-off (load shedding)
Found on eBay, also available from various dealers on Aliexpress.
Usage
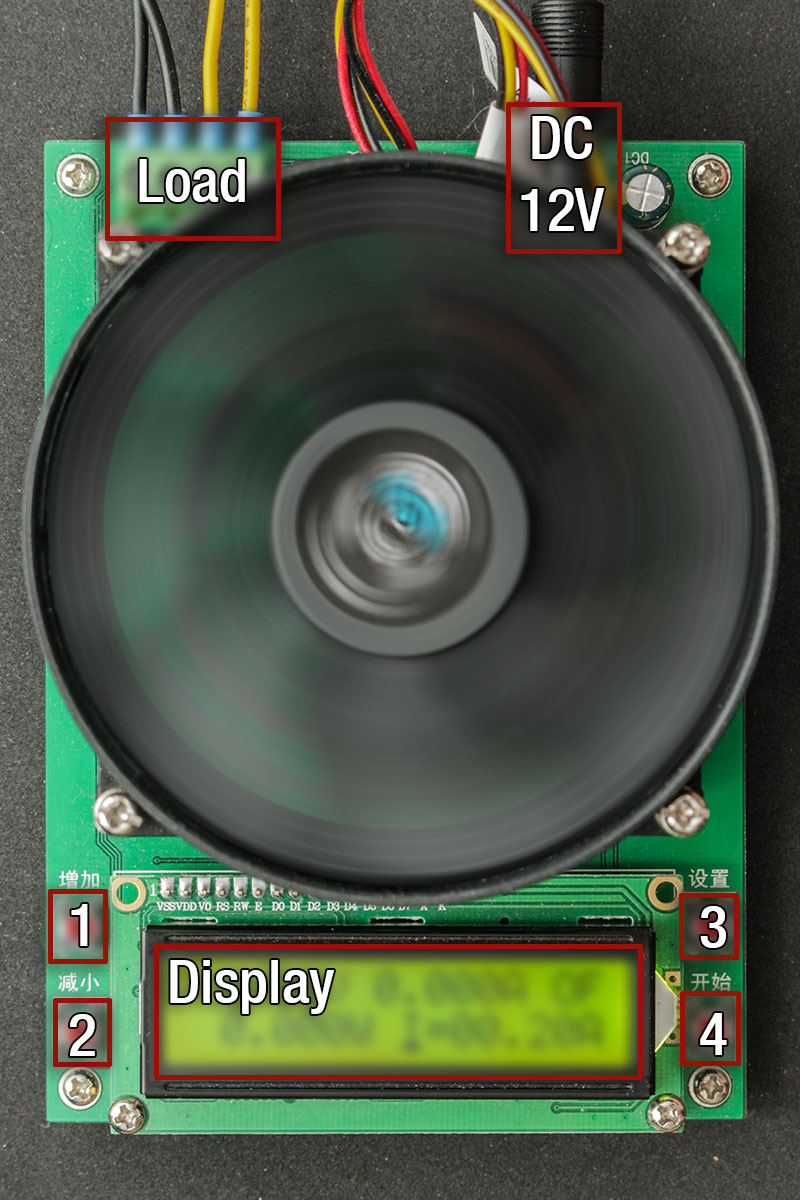
Power supply via "DC 12V" jack, the burden is connected to "Load" via Four wire measurement, Settings are changed with buttons 1-4, parameters are displayed on the display.
Key mapping
1: Up
2: Down -
3: move cursor
4: On/Off
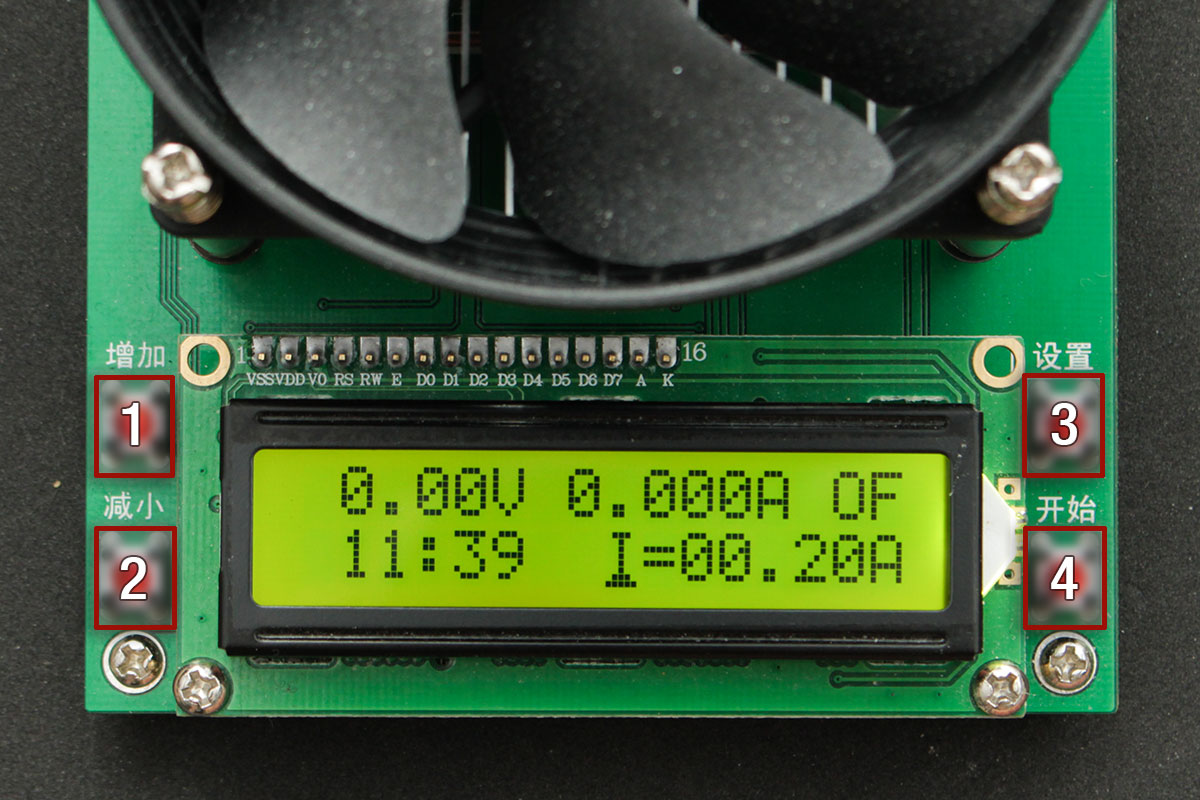
Setting current
Set cursor by button "3" to position "I/V", select "I". Set cursor to numericals and alter values by buttons "1" / "2″.
Setting voltage (lower voltage limit)
Set cursor by button "3" to position "I/V", select "V". Set cursor to numericals and alter values by buttons "1" / "2″.
Switch load on/off
Press button "4".
Reset values
Press and hold button "4".
Select indicated values
Hold the button "3", at the same time press button "1" to select parameter. Button "2" resets display to "Auto", parameters are now displayed in sequence.
Buzzer on / off
Hold down button "3" while pressing button "4" at the same time to enable/disable the buzzer tone.
Adjust displayed voltage value
The setting shall be changed while having a load/battery connected. Press and hold button "3" until "Adjust mode" is shown on the display. Voltage then can be adjusted by buttons "1" and "2". Finally confirm with the button "4".
Special functions
The following settings/functions are accessible by various key combinations when the device is powered on.
Display the software version
Hold buttons "1" and "2", connect the power supply. The version number - in this case "Edition 1.62", appears on the display.
Factory calibration
CAUTION! This mode can make the device unusable when done wrong.
A power supply must be connected to the load connection which sources exactly 10V and 5.00A (current limit set).
Hold buttons "1" and "2", connect the power supply. The version number appears on display. Now press button "4" and enter the password using the keys "2" and "3". To do this, press both keys alternately until the calibration starts. Finally disconnect the supply.
Auto adjustment
For auto adjustment, a battery/rechargeable battery pack must be connected to the load, which provides less than 20V and can source more than 5A load current.
Hold the button "3", connect the power supply. The display will show "load V<20V A>5A - start to next". Press button "4" to start adjustment. Finally disconnect the supply.
Fakes
"Fakes" are offered through the sources like eBay / Aliexpress lately, which are restricted in scope, measurement precision and can be potentially dangerous, because they do not reliably disconnect the load or deeply discharge connected batteries.
Thing noticed:
- the current is exceeded
- Low voltage termination limit is not always reliable
- displayed measured values are too high/low
- Calibration/adjustment cannot be done
- Different components
AGML battery charger


Thanks for compiling this page, it’s appreciated. Do you know if it’s possible to get serial data out and if so, what format/fields are passed through? Thanks in advance.
Unfortunately there’s no serial output on any pin.
Now, he also offered the alleged new 2018 version V.2.26 or V.2.27. I received one of these, although the V.1,6 was imaged with the order yet. The accuracy seems I.O. to be. Unfortunately, it lacks the feature Calibrierung / Autocalibrierung.
Man kann auch die Strommessung justieren. Dazu muss man die elektronische Last einschalten, bevor man durch gedrückt halten der Taste 3 in den adjust mode wechselt. Für Justierung der Spannungsmessung also bei ausgeschalteter Last und für Justierung der Strommessung bei eingeschalteter Last den adjust mode aufrufen.
Wenn man im adjust mode ist kann man mit Taste 3 zwischen dem angezeigten/gemessenen Spannungs- und Stromwert umschalten. Beim Justieren ist es so, dass man sehr fein mit den /- Tasten (Taste 1 und 2) den Wert einstellen kann. D.h. ein Tastendruck entspricht nicht etwa der jeweils angezeigten kleinsten Stelle vom Wert (also z.B. nicht 0,01V oder 0,001A). Wenn man ein entsprechend genaues Messgerät hat, das z.B. Stromwerte in A mit 4 Nachkommastellen genau anzeigt, kann man entsprechend Rundung ab x,xxxx5A auf x,xxx1A sehr fein justieren.
Ich habe mir zur Spannungs- und Stromjustierung einige Zeit genommen und kann sagen, dass diese Elektronische Last nach genauer Justierung über den gesamten Messbereich sehr genau arbeitet.
hello,
how long is maximum time interval for measuring? Can load count only to 9h59m, or higher?
I want measure high capacity battery with small current and estimated time is around 40 hours. Can this load measure that long time?
Thank you!
If i remember correctly it stops at 9:59:59 so only 10 hours possible. I will have the unit run over night to doublecheck.
After having the unit running for several days, i can confirm it does at leat count up to 99 hours and 59 minutes.
I purchased a fake unit and it is absolutely useless. Cost to return it is too expensive .
Does anyone have a firmware image that I can upload to make it useable.
These STC controllers (usually) can’t get dumped, due to encryption and “one-way-programming”. More infos here:
https://github.com/grigorig/stcgal/issues/18
What evidence do you have? Test results? I have 5 pcs, different supplier, everything fake!!!
Unit is showing the firmware version, PCB version under display, fan is a CoolerMaster brand, shown values are within spec, wattage is calculated from actual values, not from setpoints.
I received my original electronic load (not a fake one) from KKK-store at aliexpress. Took quite a long time to get to germany though.
This site is a warning to fake manufacturers.
If there are false producers, how can I recognize a fake product?
Where can I find a certified vendor?
Thank you for answer.
PETE
In discharging mode, we must disconnect the 12V ACU at a voltage of 10.5V!
Similarly, the 24V battery must terminate at 21V.
The manual has no info how to set the voltage 10.5 or 21V.
The query to seler has no result.
Can you explain this, please?
Select voltage mode (V) and set the voltage to 10.5V/21V, then select current mode (I) to set up your desired discharge current.
My dummy load seems to work fine except that I cannot get it to show the software version. Worse, the on/off button does not work well. Sometimes when I shut it off, it shorts the load! It says 0.00 A, but my own independent current meter shows a ton of current. I have to hit on/off a few times to get it to fully turn off! Scary stuff. Is mine a fake?
I bought one of these fakes, unfortunately too although the provider on Aliexpress (store name: Pro powers tools store) clearly the correct version of "ELECTRONIC LOAD V1. 6" including correct description and pictures shows. Send he unfortunately does the fake version.
Am in the dispute, he thinks everything is i.O., and he even says that he knows that there are two versions. So even worse than if he would sell the fake ignorant. I'm afraid that by now hardly anyone offers the original, will probably be more expensive in the shopping.
If anyone has a source where you can definitely get the original, I would be very grateful.
Wanted you here show the images fake/original?
A help for those affected would be safe.
The fake is totally out of specs. Already the voltage display is regarding accuracy at 15V factor 13 on specifications, at current, it is much worse.
In addition, the display shows often utter nonsense. Or from 10A 0.000A will be shown. Unfortunately there is no problem about 10A to come, the device simply not properly recognize that.
It shows me 30.000W at real 150W. Maximum it can display apparently 99.999W, > = 100W were never shown to me. So complete nonsense.
I have noticed is, that's performance is apparently from the set (not the measured or actual) power multiplied by calculated with the switch-off voltage setting and not the measured voltage, because the value does not change during operation and stops on this product constant. That is of course complete nonsense and apparently a fat programming error (along with many others).
The switch-off neither regarding maximum output power works reliably, no wonder if it crap crap. Basically, you can the fake only as donors of part of understand I would never trust on (high-quality) batteries or other equipment.
I'm curious to see how Aliexpress, the seller will probably not turn I suspect after the first response I have received from him.
Greetings,
Candid
In order to bring the whole thing at the end 😉 I had contacted some vendors after bad buy and then get ultimately at Aliexpress KKK store a real / working version.
About Aliexpress I have a few weeks back and forth finally get my purchase price refunded in full. I took pictures and created a video where you can see the malfunction very good. Then it went fast. The seller himself was of course completely unapologetic.
Mit der Fake-Version habe ich, da sie keinen funktionierenden Überlastungsschutz hat experimentiert. Mit einem großen CPU-Lüfter (Alpenfön) konnte ich konstante 180W rausholen, ohne den MOSFET zu überlasten. Die korrekte EL macht das nicht mit und begrenzt auf 155W. Die schafft die EL locker mit einem ordentlichen Kühler über stunden stabil.
Unterm Strich kann man sagen wenn man die korrekte EL bekommt hat man für sehr günstiges Geld und nach Umrüstung auf einen ordentlichen CPU-Kühler für eine sehr stabile und genaue 150W EL für um 50 EUR.
Thanks for the feedback. 🙂
Hi,
It Is very generouse of you to investigate and publish these details, Thanks for that!
I searched the right seller from Ebay to buy this Load tester and i wonder if you can send me the seller you bought from this by email?
Thanks
Does the device automatically shut off when battery capacity test is complete? Does the video even show capacity test? I cannot tell.
Thank you for the attention, Sir.
Yes it does if you set the voltage level accordingly the limit of your battery before starting the discharge.